Text and photos for project SUZUKI RGV250 by Paul Pearmain and Matt Patterson, © TYGA-Performance
It was one of those days you remember well, the day I first saw this VJ21 and I can’t honestly say it was love at first sight! I’d just walked out of the stifling Bangkok heat and humidity and into the refreshing air conditioned showroom, of Red Baron Motorcycles. At the time, this was the mecca for motorcycle enthusiasts in Thailand and was full of rows of the latest CBRs, GSX-Rs, Ninjas and Hayabusas etc. all of which were well beyond my budget.
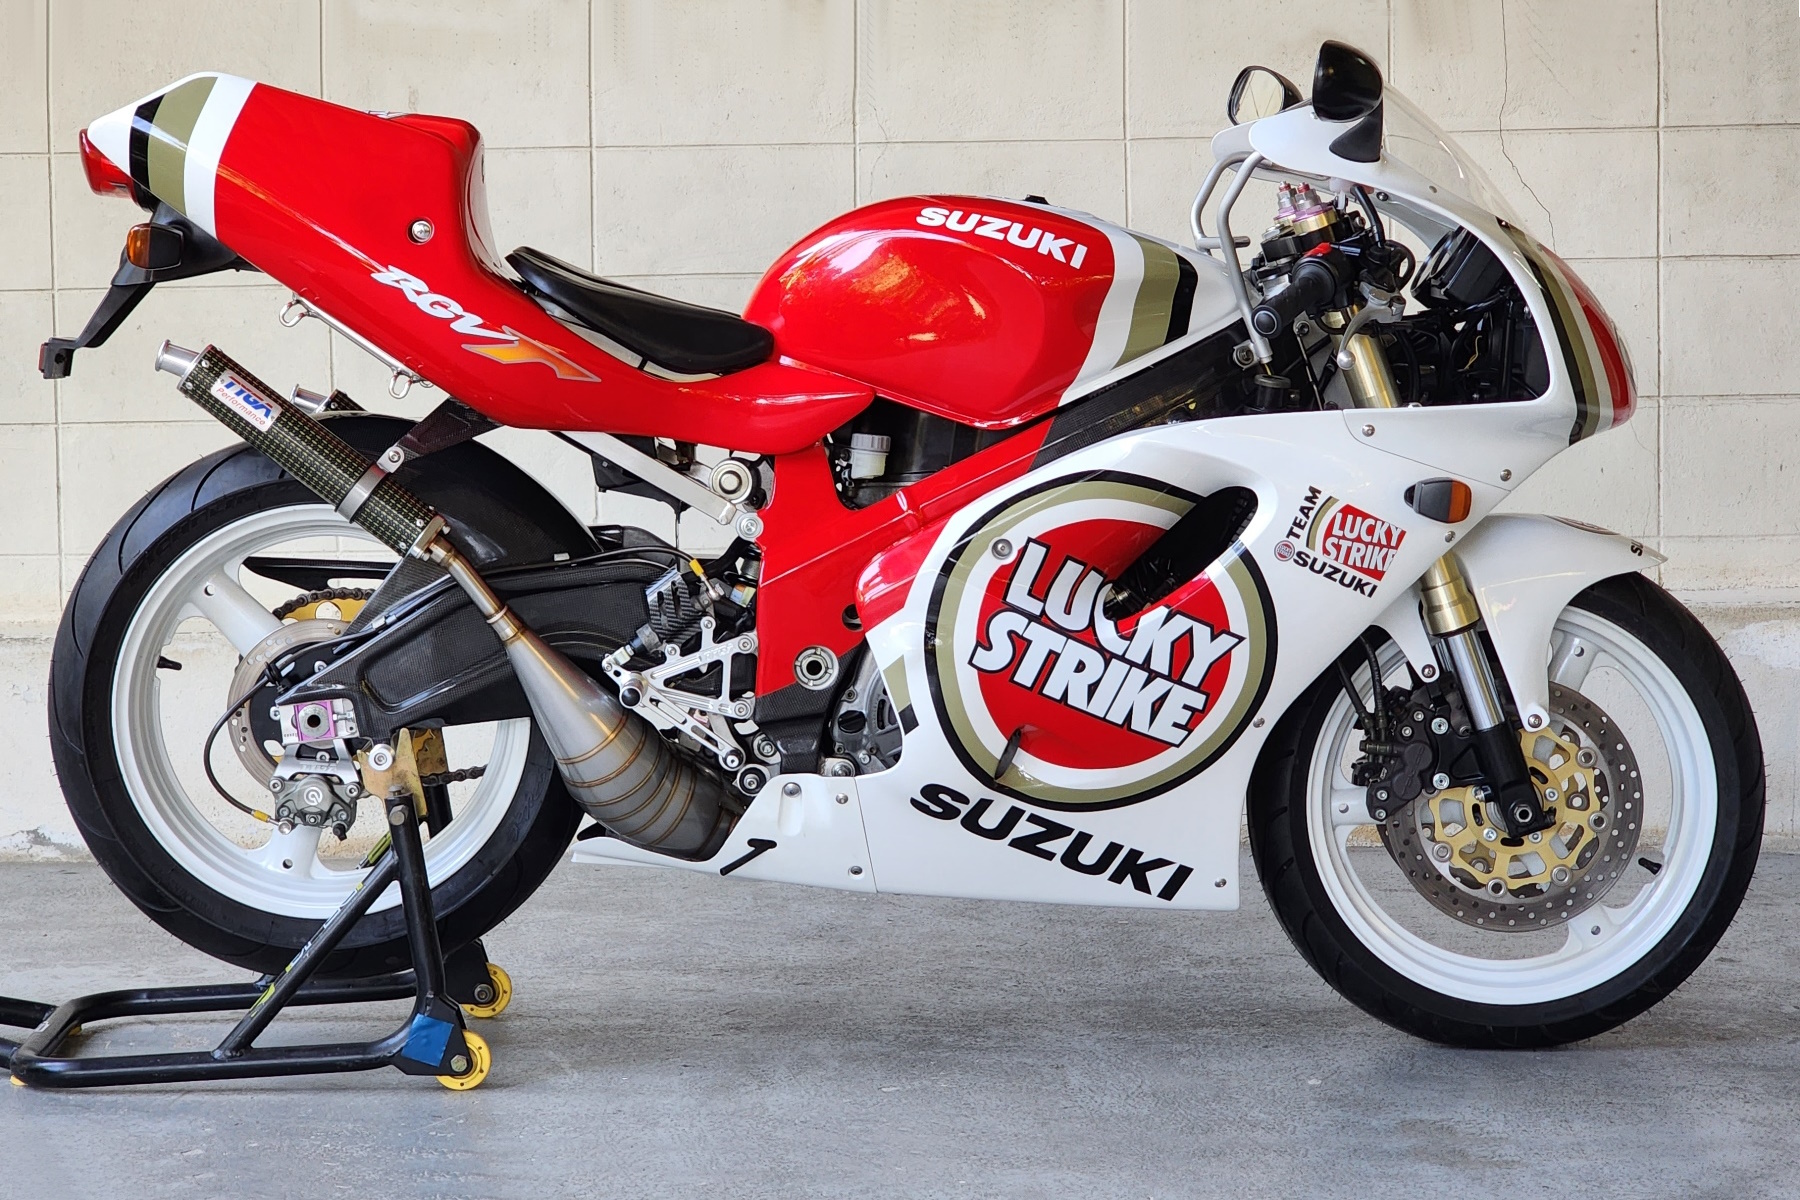
Then something caught my eye parked near the lift at the back. The little Suzuki RGV250 was probably a trade in and seemed to be deliberately hidden away, lest it spoil the scene of modernity and power conveyed by the shop’s range.
Some context is required here and in 1998, at the height of the Asian financial crash, a two stroke sports bike was about as popular as a VW diesel is today. Even with its brand new Lucky Strike paintwork and dealer warranty, the star shaped sticker on the screen only dared to ask a meagre 40,000 Baht (approx. 1,000 USD at the time). To be perfectly honest, even to a believer like me who has always loved 1990s two strokes, it looked really dated with its 18-inch rear hoop and weird oversized mirrors and indicators. Not my cuppa tea; but I knew a French bloke who would love it. A few days later, the deal was done and Olivier was enrolled into our exclusive ‘Pattaya 250 two stroke expat gang’. He kept up well on his antique contraption and what it lacked in sophistication, it made up for in power. Despite me never admitting it to Olivier, I was secretly impressed.
Starting of the project Suzuki RGV250
Fast forward a few months later, and I am not sure what prompted it, but Matt and I were very heavily under the influence of something popular at the time. Olivier’s bike was parked under the stairs in our rental house, caught our eye and became the topic of conversation. We agreed that the way Suzuki designed the seat cowling was a bit low for our liking. So, even though this was pre TYGA Performance, we decided to modify it. Our tool of choice being a big garden hoe. Looking back, it is surprising that the hoe’s hardwood handle was stronger than the frame but anyway, two cracked welds later, we had the seat cowling in the position we liked. Content with our designer skills we retired for the night. Next morning, after we sobered up, we got a local welder to weld it into the new position and this was the start of a project bike that has been in process ever since. You could therefore tenuously say that, at 22 years making, it has had the longest gestation period of any TYGA project.
I think Olivier eventually forgave us for mutilating his bike, even touring together on a very eventful 500km trip to the island of Koh Chang, (RC30, CBR900RR and VJ21). The fact the island had no roads at the time didn’t deter us one bit. On the mainland, a local farmer turning right on his chicken chaser with no signals caught Olivier by surprise. Olivier managed to hit it from behind and impale the VJ21s tyre with its exhaust leaving a cookie cutter hole in it. Luckily nobody was hurt and with a TZM rear tyre pressed into service on the VJ21 front wheel, on we went. We made it round the island and back to base with happy memories and only a few scrapes and a cracked RC30 belly pan. A few months later, Oliver found a new job and country to live in. He rode the VJ21 from Pattaya to Kuala Lumpur, Malaysia (which was around 1600kms one way). He used the bike to commute to work for a year or two even though it was still Thai registered. After his contract ended, he came back to live in Thailand, and naturally he rode it another 1600 kms back to Pattaya to start a new life for both him and the bike. Unfortunately, the Suzuki was literally put out to grass. When I next saw it a couple of years later, the poor thing had been left decaying in his yard and was in a very sad state and Olivier lacking the budget to restore it. Feeling sorry for Olivier and the VJ21 in equal measure, I bought it off him. I guess nostalgia got the better of me, and the registration had always been in my name. There was no other rational reason for the purchase, and unfortunately it then sat in storage for a few more years.
Then in 2008 we finally got inspiration; we had a plan! Due to us parting out an incomplete VJ23 when a customer needed an engine, we were left in possession of the front end and swing arm with rear wheel and shock which was all surplus to requirements. Meanwhile, the VJ21 styling had grown on me (but not on Matt it has to be said) and a VJ21/23 would make for an interesting build. For a while, things moved along well, we had the front end installed and Matt had CNC machined a special top shock mount so that the longer VJ23 rear shock and swing arm could be slotted in too. We sourced a Cagiva Mito sidestand (ride height was now too high for the stock item). We even got ahead of ourselves and had the bodywork repainted in the iconic LS paint in preparation for the final assembly. Not sure why, but then we lost interest. The bike just sat, and sat some more; the years went by, a decade went by, and the only thing that changed was various bodywork parts were stolen off it for other projects. The dust got thicker and the corrosion got more ingrained. It was a pitiful sight. Frankly, it was only that we wanted to preserve the precious VJ23 components that it wasn’t just rolled out into the shrubs to compost, so it had at least something to be thankful for. Forlorn but not forgotten, we always had a plan but it was never really the right time… until a year ago.
September 2019, was the month the fortunes of this two stroke turned around. In recent years, we have had a lot of requests from VJ21 owners to make more parts. Looking at the sales figures for products we were already offering like the exhaust and step kit, there were obviously a lot of VJ21 owners and enthusiasts out there. We needed a project bike to get inspiration to develop more things and to show case the ones we already offered. The Suzuki was dragged into the workshop with two very literally flat Dunlops and appraised and was not a pretty sight. It was one of those situations where you can see huge potential, while at the same time you feel deep despair! We’ve learnt it is best not to dwell on these things and just get stuck into the work. The bike was stripped down and parts ordered. A huge list of parts, mostly nuts and bolts, was ordered from Suzuki. The list of TYGA parts got longer as we got more ambitious and decided to design and prototype more and more specific VJ21 products. Maybe we got a bit carried away, and for sure, we could have completed it a lot sooner if it were not for all the experimentation and special parts we kept adding. But anyway, that’s why we built it, so with no further preamble, (and what a long preamble it was!) let’s see exactly what was involved.
Suzuki RGV250 – The plan
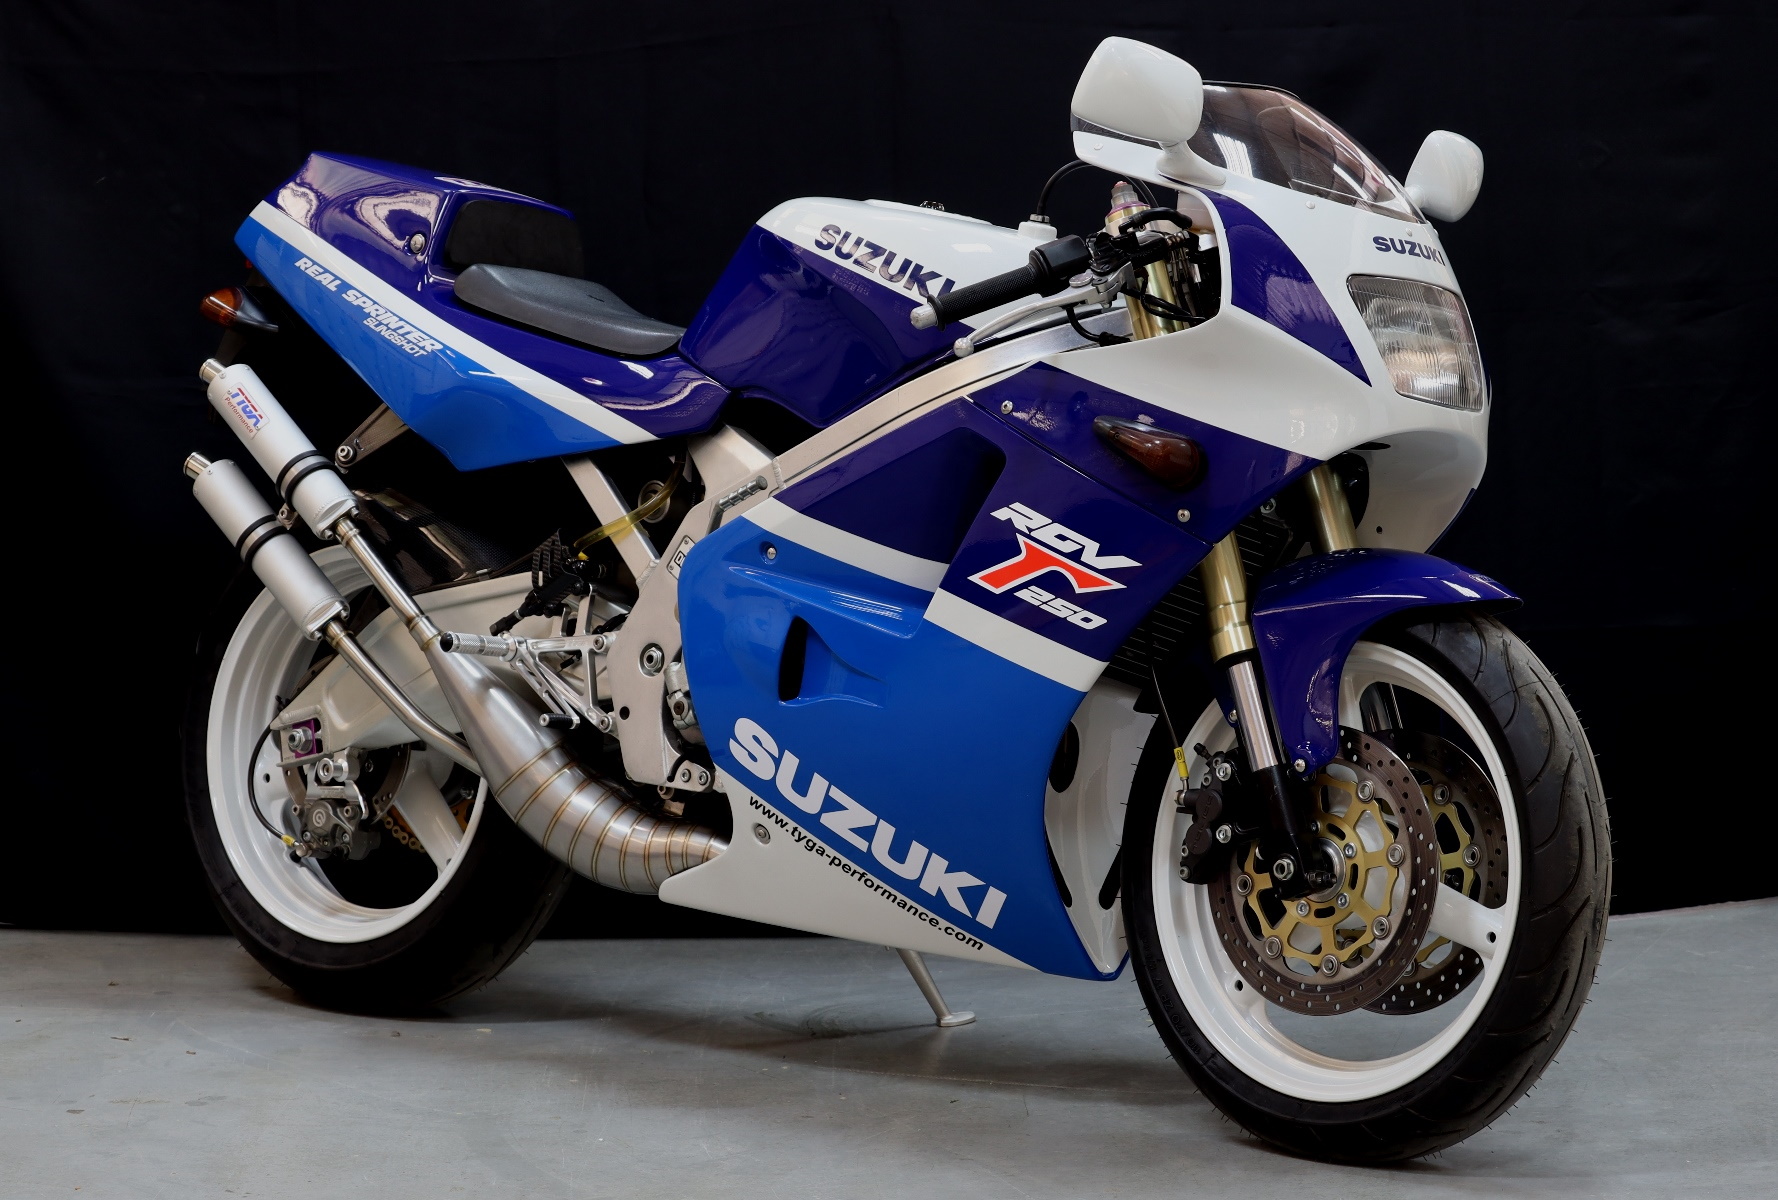
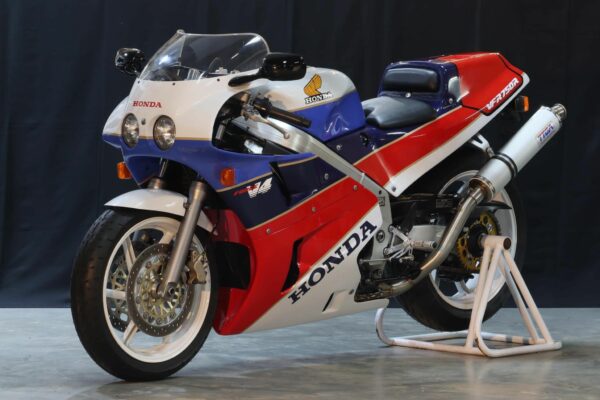
Our plan was to keep the original VJ21 styling and character but upgrade components to bring it to the level of the latest generation of 2 stroke 250s. In addition, as already mentioned, we wanted to reduce weight and improve performance by installing our latest and popular TYGA products. Being a bit of a hybrid, it actually has products that would normally be found on VJ21, VJ22 and VJ23 models depending on the application.
Let’s start off with the chassis. As already mentioned, the complete front end of the bike including handlebars is from a VJ23 and this is now secured to the frame by means of a VJ22 TYGA triple clamp set.
Similarly, the rear, as mentioned above, was liberated from the very same VJ23 and consists of swingarm, linkage, rear shock and rear wheel. The swing arm pivot only required a washer on one side to fit but the top lug on the rear shock was higher than the stock VJ21 set up. Matt designed and machined a different top shock mount out of aluminium and this allowed us to retain a decent geometry while increasing the ride height somewhat. More on this below… In its latest reawakening, further modifications consisted of a TYGA rear brake bracket and Brembo caliper and TYGA lightweight 46 tooth aluminium sprocket to lighten the load and enhance the visual appeal.
Due to the increased ride height, as mentioned above, we had originally installed a Cagiva Mito side stand. However, a customer had already drawn our attention to using the Triumph 675 stand on the NSR250. We liked that idea and already had a new Triumph stand on its way from Ebay. Just in hope more than anything, we offered it up to the RGV and to our delight, with very little modification of the holes, it fitted and looked the part.
The frame itself is the original VJ21 frame that had been to Malaysia and back. It is still registered in my name from when it was purchased from Red Baron. It’s been through a lot with dings, pitting and scratches but hey, these just ‘add character’. None of our bikes are really show quality and nowadays, plenty of bikes on the web are much tidier and have had more attention devoted to them so this is more an exercise in inspiration than showing the ultimate ‘as new’ VJ21.
As anyone who is familiar with the VJ21 will know, the model only has a half subframe, the forward part being welded to the frame. As our bike was going to feature a single seat cowling but required the rear fender and gubbins for taillight and turn signals, we would require something to hold it all in place but we were adamant that the original subframe was never going to be reinstalled so we decided to design and make our own alternative. This was to be fabricated out of aluminium and powdercoated black. As Matt says: ‘The new subframe, was a necessity. The stock wrought iron construction is unbelievably heavy, and has no place on a 250cc. Well, it’s probably a good thing if you’re hauling a pillion, but we have no plans for that. We went through a handful of iterations before settling on what we have now’. The weight saving of the TYGA version is a prodigious 1.56 kg (0.54 instead of 2.10 kg).
Despite this weight loss program, we were keen to retain the practical aspects of the stock bike and so the stock rear fender, taillight and even the radiator overflow bottle can all be easily installed using the TYGA subframe, although the latter is now accessed from inboard and above the rear wheel in the rare occasions it needs attention. To further tidy up the rear end, we installed a rubber mudguard to prevent weather and grit reaching the various electric boxes below the rider’s seat. It’s an easy and practical modification. One other thing to mention is that on the stock subframe, the dangly passenger pegs also double up as mounts for the exhaust. Obviously on the TYGA subframe, we intend this to be a single seat bike and so the provision for pegs and therefore exhaust mounts was no longer available. We therefore offered up our TYGA ZXR400 carbon exhaust stay and by installing a small stay off the subframe mounts, we were able to get a perfect mounting position for our GP exhaust system. More on the exhaust later.
In the interests of mass centralization, the front end now needed weight reduction too. We had just removed a ton of weight off the back and the front meter stay is also unsurprisingly ridiculously heavy. Suzuki must have shares in Rio Tinto or something! We were able to faithfully replicate the meter stay in lightweight aluminum tube and bar and all components such as headlight, meter, horn and flasher relay can be installed the same as stock. The only compromise being the extension to the tube with wire guide for the speedo cable which we opted to omit. Matt’s thoughts were: “The meter stay was really just a continuation of the subframe. We had all the materials out and the welder was on AC, so seemed the obvious thing to do. The only real problem with the meter stay is that, with its factory powdercoat appearance, it looks the same as the stock item, until you pick it up of course :-)” . In terms of numbers, the TYGA version weighs in at just over half the steel one at 0.85 kg instead of 1.49.
This modification should be on the shopping list of any VJ21 owner whether they be restorer, modifier or racer. I’m sure Suzuki would approve!
Other work on the chassis involved installing TYGA step kits with the (redundant for our purposes) exhaust mounting loops removed. A steering damper was mounted using the frame lug Suzuki kindly provided for this purpose.
We must confess that the engine is nothing special. We hope to build a high powered large capacity version one day but for now it’s just a stock VJ21 unit. I should add, it is not the worn out one that Olivier had toured around half of Asia but another from our stock. I wish I could report that after 6 sessions of cleaning the engine, it came up like new but alas that was not the case. It is certainly clean and tidy and not to be ashamed of but a full vapour blast would have been the only way to have restored some of the pitting and corrosion. Anyway, with the TYGA carbon generator/sprocket cover, the carbon oil pump cover and the carbon clutch cover, it certainly makes the engine a lot more presentable and even a little bit special to look at.
The top end was inspected but no internal engine work was carried out. As you can see, it has had some mods done though. The VHM heads bolted on without fuss. The piston height at TDC measured up the same as the VJ22, so it seemed a shame not to fit them. This of course then prompted us to make the coolant spigots, as the OEM parts were more than a little nasty and it didn’t seem right to fit them to the spectacular gold VHM heads. Finally, we also fitted our valve covers as the originals were not aesthetically pleasing. The bolts, pulleys etc. were either replaced or replated and this also helped to tidy things up.
Power is enhanced by courtesy of a pair of TYGA pod filters. As Matt says, “Not exactly sure why we’re not running the airbox. Just too lazy to put it back on I suppose, but with that being the case, we needed to keep debris and small creatures out of the carbs. We don’t like to do things the easy way here (like just buy a set of K&N filters), so I designed some angled manifolds and then cut and rolled up the filter material. Pieter worked his screen print magic with a rather nice TYGA logo on the munchkins. They work great. The manifolds are 3D printed in TPU and fit just as intended. The jetting is close, but still needs dialing in.”
Matt has spliced an Ignitech DC-CDI-P2 unit to fit the stock harness and set it up to give a good spread of power throughout the rev range. Over to you Matt: “The CDI and control unit on the bike had seemingly not survived being parked up forever, and I couldn’t get any joy trying to get the exhaust valve servo to do its thing. A couple of experiments pointed to dodgy black boxes. But the trouble was that we didn’t have any luck trying to source them, so in a fit of enthusiasm I decided to fit an Ignitech. This was relatively straight forward, but the Ignitech is not really that user friendly when it comes to side stand switching. If the stand is deployed, then the engine won’t run. So no chance to just let it warm up on the side stand. The problem was solved by rigging up a (headlight) relay, controlled by the neutral switch. So now all things work as they should. Neutral/stand deployed, runs fine, but if you stick it in gear with the stand down it’ll kill the engine. Perfect!”
One question that kept us occupied during the lock down was what to do with the autolube container? The two obvious choices were to leave it in the stock position (this made the subframe complicated and with a single seat cowling, how would you fill it?) or to run premix. We resisted the easy path and wanted to prove you can run a VJ21 with autolube and a single uncluttered seat cowling installed. You would think there would be an alternative bottle available that would fit somewhere. We have a big box of used 2T and rad bottles and ordered more which looked promising in photos. It was like a jigsaw puzzle with the wrong pieces and frustratingly, none would really fit. Some would almost go above the rear shock, others on the left side or the right side behind the radiator but none looked right and most had their inlets and tubes in the wrong place, and that is before even getting into their mounting holes. We did manage to find a smaller bottle which would fit behind the right carb but then it didn’t have a warning light sensor or a neck for filling it up. At best, this could have been a secondary one but then the market for VJ21s with single seat AND autolube AND no air box is getting very small indeed. We wanted something with more widespread appeal. Fresh thinking was called for. Matt amused himself during COVID lockdown by designing and printing out a perfect bottle to put on the right side behind the radiator and all it needed was a small relocation of the coil in order to work. It would hold 1.4 litres, have a low level warning light sensor and had a spout to fill it up. Perfect! For a while, we thought we had cracked it. Then the realization set in that we didn’t really have a good material to print the bottle and guarantee absolutely no chance of catastrophic failure. Such a failure may cause slippery two stroke oil to cover the rear tyre. The risk was probably low but not worth taking. So back to the drawing board. More searching online for suitable bottles, more arrived, none fitted! Honestly, if we didn’t have the VJ23 gas shock installed in this bike, we’d probably have had the issue solved in a tenth of the time. But no compromise was going to be made to the rear suspension for the sake of a bottle. Finally, after another brainstorming session we settled on an aluminum version of Matt’s 3 D printed one. What with his origami skills in sheet metal and the boys welding, the final result presented in black powdercoat finish is definitely a piece to be proud of. This is what Matt had to say about this mod.
“The 2T bottle was just a nightmare, to put it mildly. Nothing was going to work. My 3D printed bottle was perfectly sized and shaped but as hard as I tried I just couldn’t get it to print properly. We even considered forking out some extra cash to upgrade to a dual extruder printer so that we could fill the bottle with dissolvable support material, but in the end we called time, and I fabricated one in aluminium. Job done.”
Yes, indeed, it ticks all the boxes; easy access, plenty of capacity, warning light, unobtrusive but convenient position and light weight. Having gone through all this effort, this is something we are planning on offering to anyone else in a similar predicament, if indeed there is anyone else! Possibly, it will fit the VJ22 and more work will be done on that later.
The other component that really challenged us was the speedo drive. By putting the VJ23 front end on this bike, there was now no easy way to run a speedo drive to the front wheel without a lot of machining. We wanted a plug and play solution which retained the stock cluster. We like old school dials (I’m sure one day we will be vindicated once everyone who has been suckered into thinking cheap digital is preferable but anyway I digress). So, we had a fresh look at mechanical solutions and it was a long story. As Matt says, ”Let’s just say that we tried many things. On a motor to drive the cable using a sensor on the wheel; this was certainly doable, but it takes a surprising amount of torque to spin the cable, and I just couldn’t find a motor small enough to look elegant but with enough torque to spin the cable. Switching to the sprocket driven cable (a la Honda) was a good solution, and with plenty of Honda parts lying around, it wasn’t too long before we had a working example 3D printed in carbon fibre reinforced Nylon. However, the test ride showed up the quite a big inaccuracy in the gearing of the system. The final solution to fix this was to 3D print a smaller helical gear to go inside the speedo housing and also 3D print the actual housing for the new dimension gear. Again, all in CF-Nylon. It took 12 hours from concept to working prototype. A quick hoon up the road showed the speedo to be within 1-2kmh compared to the GPS speed. Sorted.” Our plan now is to refine this into a useful product for any VJ21 or VJ22 owner who wants a modern front end installed on his VJ21 or VJ22 and still wants to read their speed on the original Suzuki dial.
The next thing that deserves a mention is the exhaust system. Due to the fact that the banana VJ23 swing arm was installed, this allowed us to use a VJ22 exhaust system and, just to be different to the VJ21 configuration, we decided to go for the both chambers exiting right. Of course that then left us the issue of how to mount them to the frame. Luckily, we were able to use the mounting hardware for the TYGA VJ21 exhaust and just adapt one component so it allows for use with the VJ22 chambers. We were delighted that they cleared nicely on the VJ23 swing arm and looked like they were made for the job.
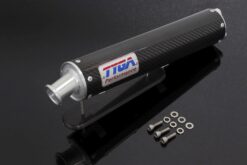
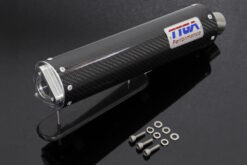
The bike being a somewhat traditional looking 80s classic, we elected to go for old school aluminium silencers and because of the big rear turn signal indicators being a bit close to the exit tips, it was decided to use the shorty type. We were then spoilt for choice having just launched our classic type EXSL-0001 with either stainless or black tips as well as our existing EXSL-9005 type. We actually installed all three types in the photos you see here and are still undecided. I don’t know, you be the judge! As mentioned earlier, we were able to secure the silencers in place using the TYGA ZXR400 carbon exhaust stay. The new exhaust set up really tidies things up over stock and, as well as adding a useful performance increase and massive reduction in weight, enhances the looks and give the exhaust note a noticeable crackle.
Talking of weight saving, we went around the bike and picked out various steel brackets and stays and made them in carbon. These include the radiator and fairing side stays (top and bottom for both), the front fuel tank stay, and the VJ22 front brake reservoir stay. While on the carbon theme, the heel guards, meter surround and chain guard are carbon, as is the newly designed VJ23 hugger which we hurried to develop just for this project.
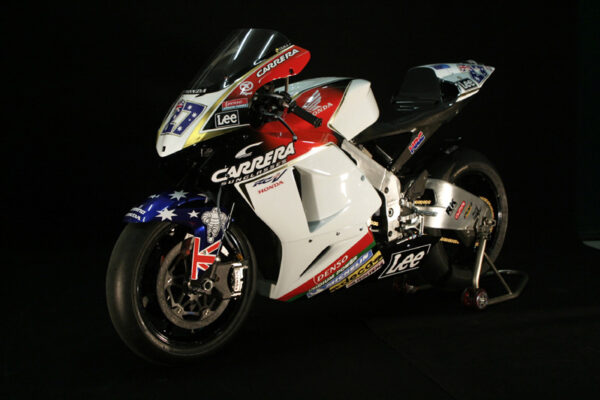
The bodywork itself is stock shaped just as Suzuki intended, and made from epoxy fiberglass which is both lightweight and strong. The various components fit in the same way as the stock plastic ones do and once painted apart from the weight saving, you wouldn’t notice the difference. This is further reinforced by the near stock paint scheme. We deviated a little here and there such as the fluorescent red gamma logo and the blue part on the rear seat. Also the white parts of the bodywork and the wheels are Toyota pearl white to give it a bit more pop. Some people might have noticed that the mirrors are actually TZR of similar vintage to the VJ21. We had some delicate black ones prepared just in case but we all decided the white ones were period and the way to go. Other things to mention are tyres, which are a 160/60-17 rear and stock sized 110/70-17 front. The chain is an Asahi X ring ASMS 520 and is holding up fine so far.
During shake down runs, we were surprised how little needed attention. We noticed right away that when two stroke oil was running low, the oil warning light would flash on and off due to oil sloshing around. This was fixed by installing a baffle around the sensor. Also, fueling seemed a bit erratic. A build-up of rust in the fuel tank from all those years of waiting to be restored was the culprit here and Matt spent quite a lot of time flushing through the system and removing the offending detritus. Not surprisingly, afterwards, the bike ran much livelier at the top end.
The first proper shakedown was without any major issues, but the steering felt a little funny, weaving at slow speed. Once parked up back at base, Matt measured the angle of the front end to find that it was a very lethargic 25+ degrees. Hmmm. That won’t do, so Matt hastily got out the spanners and had a bit of a fiddle with the front fork height and also the rear ride height (thoughtfully provided by Suzuki on the VJ23). We settled on about 23.8 degrees. Another quick spin confirmed that the changes had definitely been in the right direction, but Matt could still feel something not quite right while just cruising. Another check back at base and we found that the rear end had only 2-3mm of static sag. This may be OK for a 125 GP bike, but not really the way to go on a street 250. Out with the suspension tools and dialed in more sag. This again improved the feeling, but still had a less than perfect feel on the front end at slow and constant speeds. So after some deliberating Matt measured up all the geometry of the rear suspension linkages and compare between the VJ23 and a VJ22 (seeing as we had a complete swing arm lying around). Well it turned out that the only major factor that came into play was that we’d chosen the VJ23 ‘dog bones’, which were 158mm eye to eye, compared to the VJ22 parts which measure up at 169mm eye to eye. So he whipped off the VJ23 items and replaced with the VJ22 parts.
The first impression was that it lost a huge amount of ride height, but even with a quick bounce up and down, it felt better. The front had kicked itself out to 26 degrees now, but a quick twiddle with the ride height adjuster brought that back to the standard VJ21 setting of 25 degrees. Another test ride under the belt and there was an overall improvement in comfort and suspension movement, but still that annoying little weave at slow speed. In a final attack, Matt wondered if the WP steering damper was to blame, so he whipped it off and zoomed back out the door for another little spin…….PERFECT!!! As Matt says, “I think the problem was pretty much all because we initially set it up to look good, and didn’t take the time to make it work. But it does work now.”
The brakes are, quite frankly, shocking! we need to throw the pads away and talk to our good mate at EBC and blag some fresh stuff. The brakes do work, but require a very firm squeeze. Not what you’d expect on a lightweight replica. We’ll see if they come in (Not yet – Matt.) and if not, replace the pads or possibly even upgrade to a different master cylinder. We have yet to give it a long ride and make that call.
We plan to do some laps at the circuit and we’ll add some photos to this story when we have anything new to report. I’ll leave the last thoughts to Matt: “As with all projects, you have to call time somewhere. There’s still some small things to do as we’re never really happy, but I think that’ll do for now.” Agreed. 22 years in the making is quite long enough!
Read the original story here.
Related